
Daniel Jason Booth
Producer | Engineer | Musician
Daniel has 25 years of experience in making music. He is currently mixing for clients both locally and internationally, including a number of songs featuring a Grammy-Nominated Hill Country Blues artist from Northern Mississippi. Daniel is the owner and lead mix engineer at SPLMixing.com. You can also find Daniel on his YouTube channel ‘SPL Mixing’, which currently boasts over 17k+ subscribers!
Introduction
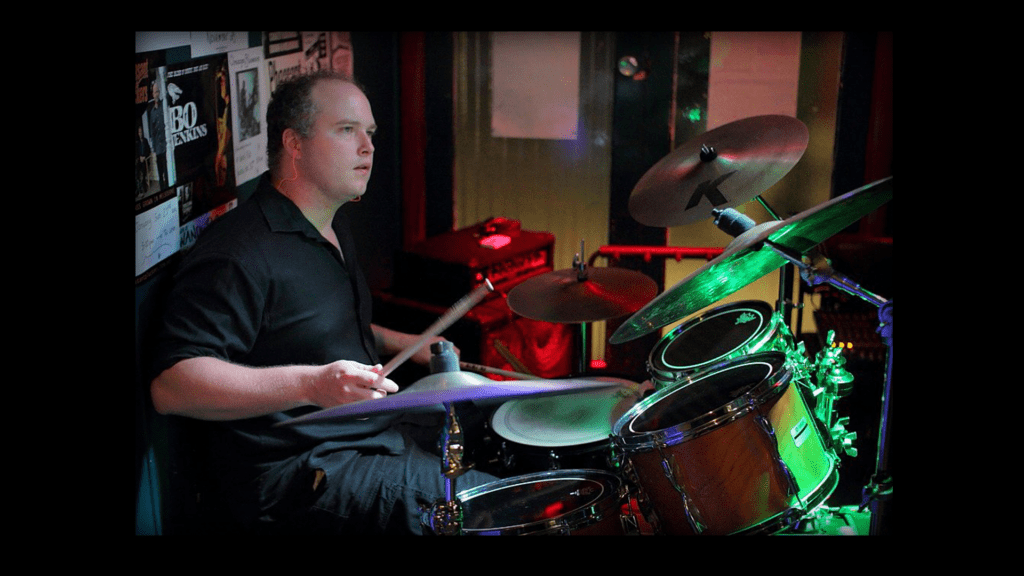
“What the heck is that?!” said my friend, referring to my unusually angled drums. “I don’t understand — did Steve Gadd change his setup? What gives?” he asked. “No,” I replied, laughing, “my back feels better playing this way, plus my playing is more dynamic”.
You see, long before I became a sound engineer, I was a drummer. From age 13, I started lessons and soon developed a healthy obsession studying from the greats.
Steve Gadd was (and still is) my hero. I spent hours listening to his solos and looking at photos of his setup. I copied the angle of his cymbals and drums as best I could from photos, on a quest to attain his sound.
There’s just one problem: I’m not Steve Gadd! My physique is completely different.
He made a bunch of noise for 10 Ear-Muffed Minutes and then, with a wry smile says, “It’s your turn now”.
Steve angles the drums and cymbals in towards him, and that’s fine! He’s a God and can do whatever the hell he likes!
For me though, this spreads the kit out, meaning I have to reach further to hit everything. My body doesn’t move the same way, so I did my own variation on his theme (see below).
Nevertheless, I would suffer backache in the name of artistic pursuit for years to come. I guess you could say at that point it became an unhealthy obsession.
Fast Forward To Now
My 5-year-old son walks into my practice room and asks, “Dad, can I play drums?”
I carefully set them to his height because the little tacker couldn’t reach the pedals. He made a bunch of noise for 10 Ear-Muffed Minutes and then, with a wry smile, says, “It’s your turn now”.
I’m certain he knew this would serve some sort of comedic value. So, with my knees firmly pushed up against my chest and my arms barely reaching down over and around my knees, I try to play, but suck so bad.
My son rolls on the floor, laughing at the giant Gorilla playing the witty-bitty drum set. I had milked the gag for all it was worth.
Low Drums
The next day, I noticed how low I’d set the drums for my son and this got me to thinking: How low could I comfortably set my own drums and would there be any added benefit? It would seem not without its perks.
As a recording engineer, I must also consider the recorded sound, so I wanted to experiment first. Lower drums might mean more space to place microphones in ways that serve both the recording engineer and the player (me in both cases).
A potential win-win situation, who knows?
Let The Experiment Begin!
Both feet must easily rest on the pedals in a way that makes you feel grounded, so I start there. I wanted to compact the kit more and shorten my reach.
Once I found a good seat height and locked it in, I focused on setting the snare angle and height.
To maintain a nice straight back, I needed to set the snare at a height & angle to suit. This, though, had a knock-on effect for the other drums — especially the tom position just above the snare. The snare needed to be ridiculously high, so this wouldn’t really work.
I’ve seen other drummers do it, but assumed it had something to do with playing with a traditional grip.
Back To The Drawing Board
Then I figured:
My seat height is fine. I just need to set all the drum angles and heights to suit that. As long as I don’t need to reach far and maintain a straight back, it’s happy days.
Perhaps the snare needed to angle away from me? I thought to myself.
I’ve seen other drummers do
I eventually found a height and angle that worked for the snare, whilst maintaining a straight back. In fact, there were a few options at my disposal. The higher I set the snare, the more I could angle it away from me.
Moving Around The Kit
Given that the snare was angled away from me now, it afforded space to set my 1st tom lower. However, the lower I set the tom, the closer it needed to be so I could reach it easily.
I experimented and found the ideal snare angle and height, choosing from the multiple positions that could work. Eventually, I found one that allowed me to set the tom within easy reach too.
I set the 2nd tom at a similar angle to the 1st.
The 3rd tom I set at the same level as the snare, though I decided upon slightly less angle than the snare drum. I wanted to avoid hitting the rim, which was a desirable technique for snare playing but not necessarily for toms.
Lastly, the floor tom was a bit more challenging. My floor tom legs weren’t long enough to accommodate steep angles, so I set it angled somewhat flatter and facing towards me. I may raise it off the floor at a later date, but it works okay for the moment.
Hi-Hats & Cymbals
The ‘hats’ ended up a lot higher than my snare, which was fine. Drum recordings typically suffer from hi-hat bleed into the snare microphone, so a bit more distance wouldn’t hurt!
In truth, it was set near to where I had it before, baring one tweak: I angled the hats towards me slightly using the screw on the bottom.
Basically, anything below a certain height I angled away from me and anything above that I angled towards me. I added the rest of the cymbals based on that philosophy.
The Benefits I Found
Now my drums are set lower than they were originally, and it affords me more room to fit microphones over the drum heads — without being in the way of cymbals. This appeases me as a recording engineer and a drummer!
With a bit of adjustment, I’d reduced the footprint of the entire kit. This allowed me to sit closer, reducing the amount of reach I required to hit each drum.
I find my hands are at an ideal angle for rim shots and centre snare hits.
What I found more interesting is that the steeper angle of the snare put me slightly short of the ideal height to tap-out softer notes (drummers call these ‘ghost’ notes). I have to drop the stick a tiny bit further than my natural extension, and so found I struck the drum a lot softer.
This translates to having a greater dynamic to my playing because I can play even softer with more consistency than before.
Now with my back straight and all the drums within perfect reach, I find I don’t put my body under as much strain. If I start slouching, I clip drum hoops – which serves as a stern reminder to sit up straight!
How You Might Implement This
Follow these steps:
- Rest your feet on your pedals and adjust your seat height
- Keep your back straight and place your snare
- Adjust the snare height & angle (away from the body) to suit your straighter back position
- Add your 1st rack tom, adjusting its height and angle to suit
- Repeat Steps 3 & 4, until the snare and tom height angles work for you
- Repeat the process of adding toms, angling & placing them to support your reach
- Add cymbals high above the drums, but at a nice reach and angle that suits your body
Without a doubt, each drummer needs to adapt his or her setup to their body type. Drum sizing and mountings may also restrict repositioning options. That said, it doesn’t hurt to start over and see what you can change, especially if you suffer from back issues.
Remember:
- Set all drum angles and heights to suit your ideal straight back seat position
- The higher the snare, the more you may angle it (find a good compromise)
- Anything below a certain height, angle away from you
- Anything above a certain height, angle towards you
You can always mark out your settings using a permanent marker and go back to them, so what have you got to lose?
Share your own setup break-through in the comments below.
Happy Drumming!
Postscript: Steve, if you’re reading this, I still love you!
____________________________________________________
Connect with Daniel on Facebook, Instagram, Twitter, Soundcloud, Pinterest
